


If you want to help us translate this page into Chinese, you can send a proposal to:
如果你想帮助我们翻译这一页为中国,您可以把您的建议,以
。
 |
Must read first...Using the applicationOperating authorizationOptional equipmentMust read first...In order to ensure the reliable and stable working of the system "WizardProg Mobile / Expert application + programmer" we recommend that you adhere to the rules listed below. We hope that these simple and not burdensome tips will help you to avoid some of the typical problems associated with the features of mobile devices and their operating systems, for which the operation of the control software for real time complex peripherals, usually, is not a traditional task.
Using the applicationThe application consists of three main functional modules available to the user in sequence, that reflects a typical operation session with any programmer. Each module is controlled by its own interactive screen, including: the Main Device List (IC Selector), the Device Processing Console (IC Console), the Memory and Settings Editor (HEX Editor). |
The general scheme of the application use:
| IC Selector | IC Console | HEX Editor | ||
 "点击放大...")
|
Select IC ⇨ |
 "点击放大...")
|
Load, Edit ⇨ ⇦ |
 "点击放大...")
|
Start
⇩ |
||||
 "点击放大...")
|
Operation select (e.g. Write) |
|||
Write ⇩ |
||||
 "点击放大...")
|
Set-up operation related areas and run |
|||
|
There are two auxiliary panels available to the user in each of the three main modules. According to the general concept, any left panel is designed to access the History of user actions, the right pane contains the Menu of features and options for each functional module. |
 |
||
⇩ Action history |
Options menu ⇩ |
|
 "点击放大...")
|
 "点击放大...")
|
|
>>> |
The Main Device List It is a two-level list, which represente a group of manufacturers (sources) of specific IC denominations in the first level (with an indication of their number in the group), the second level provides access to the list of ICs from particular manufacturer/source. |
| Sources List | Denominations List | |
 "点击放大...")
|
⇨ |
 "点击放大...")
|
|
The overall device list ranked by the ICs classes. The application can work with such classes as memory devices (E(E)PROM of different types), microcontrollers, PLD/GAL, static RAM, logic circuits. The classes lists are available through the panel with the named tabs in the caption of the scrolling section. The first list always includes all the devices in the current database. |
 |
|
Note: Depending on the version of the devices database the application may not support all of the above classes, so some of the tabs can either be absent or will appear when the database will have updated.
|
| Sources filtering | Denominations filtering | |
 "点击放大...")
|
⇨ |
 "点击放大...")
|
>>> |
The Device Processing Console |
 "点击放大...")
|
 |
Section of Information and Control (varies depending on the selected ICs)
Section of Programming Settings (the same for all ICs) |
 "点击放大...")
|
|
>>> |
The Erase operation, generally refers to the entire available memory of the device, so the area selection panel is absent in the erase operation window. At the time of an operation with the programmer the UI controls are blocked, however, remain accessible the home screen button and the task list button of the mobile device, as well as the system status bar.
The Memory and Settings Editor |
 "点击放大...")
|
|
|
Importing files with firmware |
| File selection | Import configuration | |
 "点击放大...")
|
⇨ |
 "点击放大...")
|
|
All the work with the files is realized in the space of the home directory of the application (usually: /sdcard/WizardProg/firmwares). To make your file available through the app - put it in a working firmwares folder by using any third-party file manager for Android. Inside the firmwares folder you can create subfolders for structured storage of your firmware files. The saving of the obtained (downloaded from the ICs) firmwares is currently organized quite primitive. When you save the contents of the given buffer, you can choose a name for it, and file type (binary/IntelHex, the extensions are offered automatically). In this case, you can place the file only in the space of firmwares folder (its subfolders or other internal filesystem space are not available for storing your files using the application capabilities). In the next versions of the application is planned to significantly enhance the ability of the data saving manager. Attention! Operating authorization of the "WizardProg Expert" applicationThe "WizardProg Expert" mobile application is created as an extended and paid version of the free "WizardProg Mobile" application. Due to having the paid form of distribution, the application requires periodic operating authorization, which had confirm the legality of owning a copy of the "WizardProg Expert" application and the fact of its acquisition through Google Play. Authorization is performed using the Internet. The authorization mechanism is closely connected with the Google Play system and it, as a rule, works automatically, without the need for intervention of the owner (user) of the application. In order to successfully fulfil the authorization process while working with an application, the owner (user) of the "WizardProg Expert" instance must provide:
The "WizardProg Expert" application does not use any data network (including the Internet) directly in its work. The mediator in the communicating process with the authorization server of applications purchased on Google Play is the Android system application "Google Play Services". If, for some reason, "Google Play Services " is excluded from the working software of the user's mobile device, then periodically performed authorization, as well as perfect work with the application that is not authorized in time, becomes impossible. A similar situation occurs when there is no connection to the Internet at the time of the authorization request. In this case, you should take care to return the "Google Play Services" to the active state on the user's mobile device and/or to restore the mobile device's Internet connection. In such cases, the application reports the impossibility of continuing normal operation as follows:
After purchasing the "WizardProg Expert" application and when you connect the programmer to the mobile device for the first time, the initial session of operating authorization is performed, so if the "Google Play Services" system does not get access to the Internet at this moment, it will not be possible to continue working with the application (application functionality will be significantly limited). After an unsuccessful session of the required authorization, the rightful owner (buyer/user) of the application can continue working with the application in normal mode at any time, providing an Internet connection to his mobile device and repeating the authorization request "manually". You can find out about the authorization status of the application in the "Authorization" section of the "Settings" menu of the application. Here, if this is required by the state of the application, you can repeat an authorization request in "manual" mode by clicking on the "Authority Request" option which has an active state in this case. |
 "点击放大...")
 "点击放大...")
|
⇨ |
 "点击放大...")
|
|
When the application received the operating authorization, its validity until the need for renewal is determined by the Google server, requests to which are sent via "Google Play Services". The application or user, for its part, does not have the opportunity to influence this process, nor does it have to control the validity periods of the next authorization assigned by the Google server. Nevertheless, the general principles, according to which the server assigns the next dates for extending the authorization, are known:
During the validity period of the current operating authorization, the "WizardProg Expert" application does not need to connect the Internet and its normal operation is completely autonomous. During the validity period of the current operating authorization, the "WizardProg Expert" application does not need to connect the Internet and its normal operation is completely autonomous. Since the periodicity of authorization checks is established by the Google authorization server in the regulatory manner, during the operation of the application, a scenario is quite likely which the need for the next authorization arose when it was impossible to access the Internet from the user's mobile device. If a similar situation is foreseen in advance or is considered as potentially possible, then we can prepare for it. When considering a scenario of long-time autonomous operation of the application (without a mobile device accessing data networks), the following should be taken before permanently disconnecting a mobile device from the Internet:
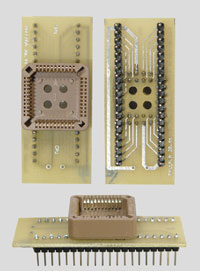
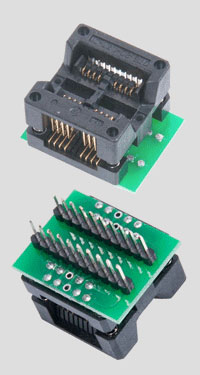
As a result, the "WizardProg Expert" application will be unloaded from the memory of the mobile device while simultaneously deleting the internal cached data. Next, having checked the availability of Internet access, you should re-launch the "WizardProg Expert" application in the usual way (from the Home screen or the Launcher screen). Then you need to connect the programmer to the mobile device, which will lead to the receipt of a new authorization for the next period, during which the application will no longer need access to the Internet and it will be able to work completely autonomously, using latest cached data of the authorization just recieved via "Google Play Services". Optional equipmentCommunication USB 2.0 cable with OTG (On-The-Go) support. Currently, the market offers a lot of USB-OTG cables of various lengths and designs. The ideal option for working with the "WizardProg Mobile" application is USB-OTG cable MicroUSB-BM/USB-BM type, no more than 1ft in length. 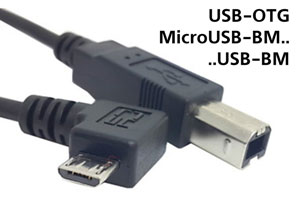 USB-OTG adapter (MicroUSB-BM / USB-AF type) often comes bundled with a mobile Android device directly. This adapter can be used with the "computer-printer" USB-cable (USB-AM / USB-BM type) or with a similar type adapter (see photo below). 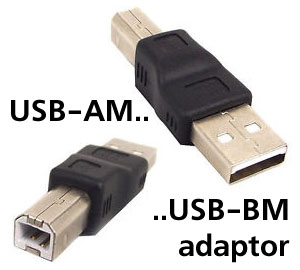 To ensure the stable work and reliable connection the overall length of the link wire between the mobile device and the programmer should be kept as minimum as possible, with a minimal number of intermediate connections. Additional adapters. Designed to program ICs in packages other than the DIP. The simplest adapters are widespread. For instance there are PLCC package adapter (PLCC32 → DIP32 and PLCC44 → DIP40) and SO package adapter (SOP/SOIC 8/16 → DIP) with different pitches of contacts in the connector.
There are adapters used for servicing Flash ROM of 25 series with a 1.8V programming voltage. These adapters can be ordered or made independently, using special schemes. Specialized versions are available only in programmer distribution kit or by order directly from the manufacturer, and are allowed to maintain VSOP, TSSOP packages using special algorithms. Specialized adapters are composed of a combination of different basements and headers for mounting the IC. |
 "点击放大...")
 "点击放大...") |
 "点击放大...") |
 "点击放大...") |
 "点击放大...") |
 "点击放大...") |
 "点击放大...") |